How to Make a Demonic Voice in Premiere Pro?

To make a demonic voice you’ll need to lower the pitch and add a lot of reverb. You can make a demonic voice in Premiere Pro by using Pitch Shifter and Studio Reverb effects.

Here’s how to apply Pitch Shifter audio effect:

  1. Go to Effects->Audio Effects->Time and Pitch->Pitch Shifter
  2. Drag the Pitch Shifter effect onto your audio clip
  3. Click edit in the Effect Controls menu
  4. Reduce pitch by 12 semi-tones
  5. Again drag the effect onto your clip
  6. Again click edit in the Effect Controls menu
  7. Reduce pitch by another 4 semi-tones

Premiere Pro only allows to reduce pitch by 12 semi-tones, that’s why we’re applying the Pitch Shifter effect twice and reducing the pitch by another 4 semi-tones.

Changing pitch will make the voice sound inhumanly low and completely unnatural which is what we’re striving for when creating a demonic voice. You can play around by lowering the pitch less or even more, the perfect amount depends on your preference and the natural pitch of the recording.

Applying Pitch Shifter effect to make a demonic voice in Premiere Pro.

After applying Pitch Shifter effect twice you’ll want to add some reverb using a Studio Reverb effect:

  1. Go to Effects->Audio Effects->Reverb->Studio Reverb
  2. Drag Studio Reverb effect onto your clip
  3. Click edit in the Effect Controls menu
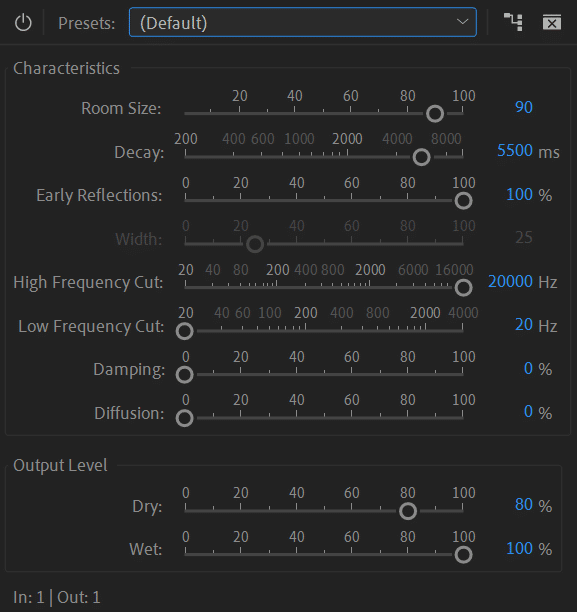
  4. Set Room Size to 90, Decay to 5500ms, Early Reflections to 100%, High Frequency Cut to 20000Hz, Low Frequency Cut to 20Hz, Damping to 0%, Diffusion to 0%, Dry Output Level to 80%, Wet Output Level to 100%.

Using reverb we are adding even more inhuman voice qualities. You can play around with the effect and change Room Size, Decay and Dry/Wet settings. I would only strongly recommend keeping Low Frequency Cut at 20Hz as we reduced the pitch to very low frequencies and cutting lower frequencies would cancel Pitch Shifter effect.

Studio Reverb settings to create a demonic voice in Premiere Pro.

Here’s original audio without any effects applied:

Original voice

Audio after applying effects in Premiere Pro to make it sound demonic:

Demonic voice

It would also help if you attempted to make your voice deeper and grittier during recording, then you wouldn’t need to rely on using effects as much and could maintain better audio quality. For tips on how to get a deeper voice read this article.

Show Comments

How to Make a Deeper Voice in Audacity?

To achieve a deeper voice in Audacity you’ll be using Audacity’s Graphic EQ and Change Pitch effects. The idea is to remove some of the higher frequencies and boost lower frequencies using EQ to make your audio warmer and then we’ll drop the pitch to get a deep voice.

Use EQ to make your voice deeper

First of all, we’ll be applying Graphic EQ tool in Audacity. You can make your voice deeper using Graphic EQ by following these steps:

  1. Select your audio track
  2. Open Graphic EQ (Effect->Graphic EQ)
  3. Boost 60Hz-250Hz frequencies by up to 4dB
  4. Subtly cut 2kHz-16kHz frequencies by up to 3dB and remove any frequencies above 16kHz

We’re using an equalizer here to remove some of the higher frequencies which as a result will emphasize lower frequencies and also we’re boosting lower frequencies. It’s quite a crude way of applying equalizer but it should do the job. To be on the safer side when using EQ don’t boost or cut more than 4dB.

Also, if you struggle with clarity leave 2kHz-6kHz and 200Hz-300Hz frequencies as they are.

EQ will add some warmth to your audio and will remove some of the harsher high-end tones. Overall, the change will be relatively subtle. You can learn more about applying EQ to enhance vocals here.

Graphic EQ settings for a deeper voice in Audacity.

Use pitch changer to make your voice deeper

Once the EQ has been applied we can get to the next step which is changing the pitch. To change the pitch we’ll be using Change pitch effect in Audacity. Using EQ we’ve quite subtly changed the voice, there’s no subtlety with Change pitch effect and it’ll make you sound like a different person, especially if you crank it low.

Here’s how you can deepen your voice with Change pitch effect in Audacity:

  1. Select your audio track
  2. Open Graphic EQ (Effect->Change Pitch)
  3. Set Semitones (half-steps) to -3 (Anywhere in between -4 to -1 should still sound realistic enough)

Try playing around with semitones, setting them lower will make your voice sound even deeper. I wouldn’t recommend going below -4 semitones if you want to maintain a realistic human voice as that’ll sound very unnatural and I would stay in -2 to -3 range. However, if you are going for something sounding supernatural you can go as low as -20.

Also, for the best result, I recommend learning some natural techniques to make your voice deeper and applying them to record a naturally deeper voice. Then combining them with voice deepening effects in the software will give the best results.

Here’s the original audio before applying any effects:

Original audio without any voice deepening effects in Audacity.

Here’s audio after applying EQ and Change Pitch effects in Audacity:

Audio after applying voice deepening effects with Graphic EQ and Change Pitch tools in Audacity.

1 thought on “How to Make a Deeper Voice in Audacity?”

Show Comments