You want to make your voice sound all nice and robotic. There are a couple of ways to do that. You can either do it naturally with your voice without any external applications or you can do it using some sort of software. The latter is definitively easier, but if you need to make robotic voice live that may not be an option.
Make Your Voice Robotic Using Online Voice Changer
This is the easiest and simplest way of achieving robotic voice using your voice.
1 step. Go to https://voicechanger.io/
2 step. Upload your audio if you already recorded it OR if you haven’t recorded it yet, you can record it on the spot by clicking ‘Use microphone’.
3 step. Choose a version of your voice which you like the best.

I found the one I marked with red sounds the best for me. But if you want a thinner voice other options may fit you better.
If you have multiple microphones, be sure you use the right one. You can choose different microphones on Windows 10 by:
- Writing and clicking ‘Settings’ in the search bar
- Clicking ‘Sound’
- Scrolling to ‘Input’
- Clicking on ‘Choose your input device’ and choosing an appropriate microphone
Note: if you are using an interface then your microphone will not be listed in the list, instead, you will have to choose interface which has microphone plugged in.
To apply more customization and choose your own mix of effects you can go to https://voicechanger.io/voicemaker. You will be able to change the pitch and combine multiple voice effects to achieve the voice you like.
Make Your Voice Robotic Using Software
Audacity
Chances are you don’t own any software to edit your audio. The best option is to download Audacity which is free open-source software. You can download Audacity from here: https://www.audacityteam.org/download/
Once you install Audacity you can start recording by pressing the red dot “Record” button. You can try speaking slower, from the back of your throat to add a bit more of a natural robotic voice.

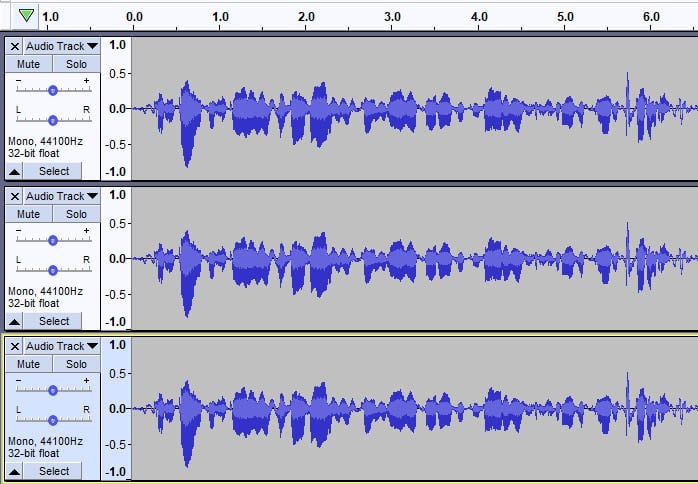
When you have the recording done, select your recording by clicking on it and press twice Ctrl + D to duplicate it until you have three copies of the audio track as shown below.

Now select the first audio track, go to Effect, then Echo… and input following settings Delay Time (seconds): 0.06 and Decay Factor: 0.5 just as shown in the image below.

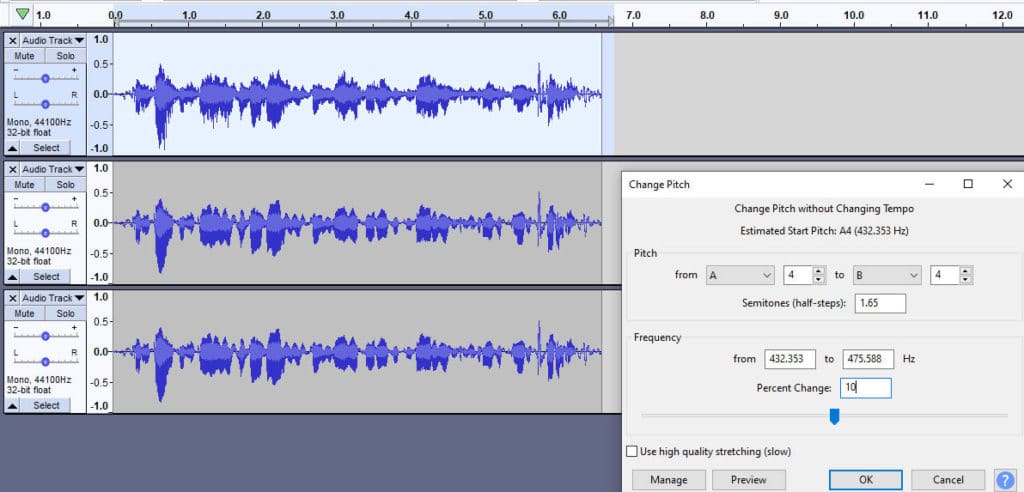
Again select the same audio track and go to Effect, then Change Pitch… and change Percentage change to 10 as in the picture below.

Now select the second track and go to Effect, Echo… and apply the same settings as previously Delay time (seconds): 0.06 and Decay factor: 0.5
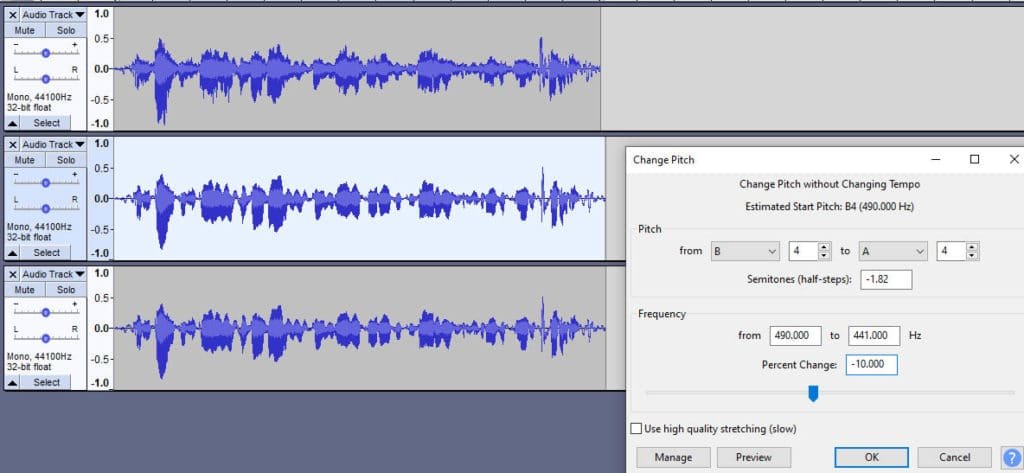
Select second track again (it should still be selected) and go to Effect, Change Pitch… then input -10 into Percent Change as in the image below.

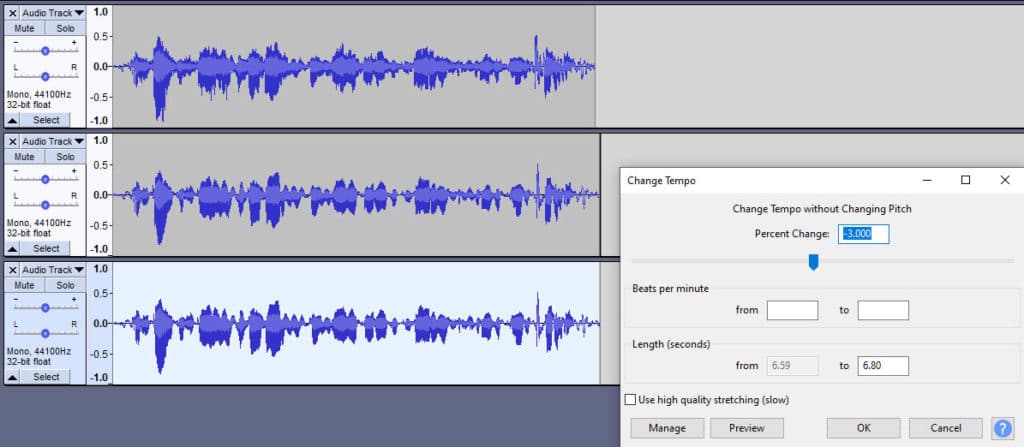
Select the third track and go to Effect, Change Tempo… change Percent Change to -3 as shown in an image below.

That should do it. You can tweak some settings by adding more or less pitch distortion and echo to your liking. I added some more details below as to what each effect does.
Note: If you are using audio interface when recording in mono in Audacity you will notice your audio clipping at -6dB threshold instead of 0 dB. This glitch is apparent in the current latest Audacity version 2.3.3 and might still be an unfixed bug in a current Audacity version.
To bypass unwanted clipping, record in stereo. Recording in stereo will fix -6dB clipping issue. When you have your record finished click arrow pointing downwards near ‘Audio Track’ text. You will find an option to Split Stereo to Mono. Apply it and delete additional unwanted tracks. You will end up with Mono tracks which start clipping as per usual at 0dB instead of -6dB.
Change Pitch… and Change Tempo… effects
To no surprise Change Pitch effect changes pitch. What is more important, it does it without changing Tempo. On the contrary, Change Tempo effect changes tempo without changing pitch.
If you want to change both tempo and pitch, you can use Change Speed effect, it simultaneously changes both. When you lower pitch your voice starts sounding deeper and vice versa, when you increase pitch it starts sounding higher.
When you change tempo to lower value you start speaking slower and also vice versa, higher tempo means you will speak faster.
Echo… effect
Echo effect adds echo… By changing Delay time (seconds) you determine how much delay there is in between echoes. Decay factor determines how loud your echoes are. If you set it to 0 you will have no echo. Decay factor of 1 will create echo equal to the original.
In other words, you can multiply original audio by Decay factor to understand how loud your echo will be. Be aware if you set Decay factor higher than 1, you may start clipping audio and introduce some distortion.
Use Text to Speech

Achieving a robotic voice with Voicechanger is easy and this is just lazy. You don’t even need to record your voice. Go to either translate.google.com or nexmo.com.
When using google translator input text by copy-paste method and press listen. With Nexmo you will have to download software and do the same there. Choose whichever voice you prefer.
This method is probably the most authentic. You are using a real robot (if we can call a computer a robot) to synthesize robotic voice.
Make Your Voice Sound Robotic Naturally
First three options are far easier, but you can get good results naturally as well. To learn robotic voice you will have to do a bit of training, however.
The first way of doing it naturally is trying to speak while at the same time clearing your throat. It will produce this deep raspy voice.
To add more effect you can make your voice sound a bit deeper by recording audio right after you wake up in the early morning. When we sleep our vocal cords collect fluids. These fluids build up because we don’t move them and makes our voice sound deeper in the morning.
The second way of doing it is inhaling while you speak. To do so you will have to practise a bit because for most of us it is unusual. It is called ingressive sound.
People in Northern Europe use it a lot, for example in Norway and Sweden. If you are not from there it will feel a bit uncomfortable. Also when breathing in and speaking try speaking from a deeper part of your throat. It will make your voice sound a bit more android-like.
Besides, doing some vocal exercises such as humming and yawning could help to warm up your vocal cords and make your voice deeper which is more characteristic for robots.
Proximity effect
To get a boost in bass try using proximity effect. Proximity effect is an occurrence when you speak closely to your microphone and that increase bass. It will make your voice sound fattened and muddy. You can use the proximity effect when trying to make a robotic voice.
You can exploit the proximity effect if you own a dedicated microphone. In overall, when achieving proximity effect, dynamic microphones do better than condenser microphones, so if you have an option choose the former.
Proximity effect works best when going below 200 Hz frequency. Hence, male voices are more prone to proximity effect than women’s voices due to natural lower frequencies.
Proximity effect alone by no means will make your voice sound robotic, however, it could provide you with that extra push towards getting the right voice. Just don’t overdo it, as extreme proximity will render your voice so muddy it will be unusable.
Use Equalizer
Equalizer can boost or reduce some frequencies in audio. It is not a must just like Proximity effect, but playing with EQ can help you to further tune your voice. Usually, EQ is used to add some clarity and improve the voice. In this case, you can play with higher and lower frequencies to achieve a perfect robotic voice.
If you want a more high pitch robotic voice, try increasing higher frequencies starting somewhere in 3,000 to 4,000 Hz range and going as far as up to 20,000 Hz. The human voice doesn’t contain any frequencies above 20,000 Hz so don’t go above that.
To achieve a deeper, bassy voice try accentuating lower frequencies anywhere from 0 to 300Hz. It will introduce a similar effect as the aforementioned proximity effect.
You will find Equalizer in Audacity by going to Effect -> Graphic EQ.

Conclusion
To get the maximum effect, try combining above mentioned voice tips, proximity effect, EQ and software guide to achieve the best robotic voice. Once you are satisfied with your voice, record your audio with your mouth close to the microphone and add additional effects using VoiceChanger or Audacity for even better results.

Pingback: Is Fiverr Good for Voice-Over Jobs? – Voice Over Tip
Pingback: How to modify the voice to Starcraft 1 Terran adjutant's one? - Boot Panic