How to Sound Younger?

To sound younger try using the higher pitch of your voice and raise Adam’s apple. Also, speak faster, louder and more enthusiastically to capture the manner of a young person. Lastly, eliminate the breathy qualities of your voice, add vocal fry, avoid soft speech and hoarse voice.

Raise the pitch

A higher pitched voice is associated more with younger people. Therefore, use a higher pitch of your voice to sound younger

To achieve a younger, higher pitch voice try to speak from an upper part of your face. It should feel as if the voice was coming from above the palette of your mouth.

You can read more about achieving a higher pitch voice in this article.

Raise the Adam’s apple

Learn to adjust your Adam’s apple position to be able to change the pitch of your voice at will. This will help to go between the regular to a younger version of your voice faster.

Raise the tongue to almost reach the roof of your mouth to position your Adam’s apple higher. This exercise will increase the pitch of your voice.

Also, practice lowering your Adam’s apple and voice to learn to control the voice better. You can lower Adam’s apple by placing the tongue onto the bottom of your mouth.

Speak faster

Sounding young is not all about the pitch of your voice, it’s also the manner of your speech that matters. To better understand a young character try to imagine what it feels to be like one.

Young people generally tend to speak fast. That’s because they often speak first and think later. While, on the other hand, with age, we tend to ponder and draw out sentences.

To sound young increase the speed of your speech. You can do so by practicing reading your script or a book at a faster pace than usual.

Sound naive and curious

With age, we tend to experience more and we become less fazed by whatever is happening around us. On the other hand, young people tend to experience new things all the time. Thus young people often sound puzzled, curious and naive.

Therefore, it makes sense to sound slightly naive or curious when impersonating a young character.

Once in a while, you can even convert some statement sentences to questions to make your character sound a bit doubtful and uncertain.

Get excited

Again, everything is new and exciting for young people. So, add a bit of excitement to your voice. Don’t be afraid to shout in excitement or finish sentences at a faster pace.

You can practice sounding excited by reading brochures or manual instructions in the most excited voice you can achieve. If you manage to show emotions while reading a manual, you can do it while performing any script.

Lose the breathy voice

As we tend to get older our voice becomes breathy due to the loss of vocal muscles. The breathy voice is created by vocal cords not closing down fully when we speak, which allows extra air to pass through, thus creating a breathy voice.

Hence, a breathy voice is associated with older age, meaning you want to lose it if you plan to sound young.

If you have a breathy voice, try to do the opposite of a breathy voice, which is adding some vocal fry.

Vocal fry is “ahhh” sound that is induced by not enough air coming through your vocal cords. It creates a crackling sound that is more prevalent among younger people.

To lose a breathy voice, try maintaining vocal fry with “ahhh” sound. Then introduce vocal fry while speaking and gradually lower vocal fry to achieve a more normal sounding voice, just without breath.

If you have a good imagination, you can try thinking of the vocal cords as a light source. If it’s a tight beam of light then your vocal cords are compressed and you sound young with no breathiness. A wide light source will decompress your vocal cords and make you sound breathy and old.

Be loud

Make yourself loud. With age, our voices become softer and we tend to speak quieter due to the loss of vocal capacity. To make your voice sound younger keep it at a higher volume.

If you can exhale more air, that will help to produce more volume and sound younger.

You can try the following to enhance breathing capabilities:

  • Exercise
  • Diaphragm breathing
  • Holding the breathing

Belly breathing exercises can help to utilize your diaphragm for deeper breathing. It will help to produce more volume and perform other vocal techniques with more ease which will all help to sound younger.

Avoid hoarse voice

The human voice becomes hoarse due to the stress it endures. You will rarely find young people with hoarse voices. On the other hand, as we age, vocal cords can get damaged when overusing the voice and start sounding hoarse.

You can get a hoarse voice by speaking at an unnatural pitch of your voice for a prolonged period, shouting, smoking or drinking.

Anything that can damage vocal cords will make your voice sound hoarse and you want to avoid it if you plan on sounding young.

If you have a hoarse voice, try resting and using it less. Also, make sure you don’t speak in unnaturally high or low pitch for too long.

By preserving vocal cords and avoiding certain bad habits you can keep your voice sounding naturally younger for longer.
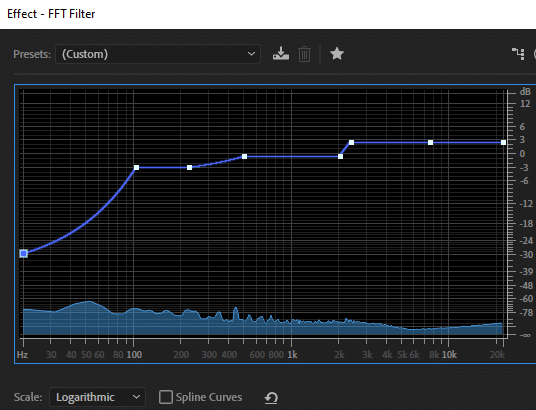
Edit your voice

Finally, if you are recording and don’t perform live you can make your voice sound a bit younger by editing it in post.

Use the change pitch effect and add a few semitones to make your voice higher pitched. Then, try increasing the tempo to make it faster paced.

In addition, cutting some of the low-end frequencies using EQ will help to reduce some bass that we associate with maturity and older age. You can follow EQ settings in the picture below to make your voice recording sound younger.

EQ settings for a younger sounding voice.
Show Comments

How to Reduce Audio File Size Without Losing Quality?

You can reduce the audio file size by exporting in MP3 file format, choosing mono instead of stereo, and lowering bit rate, sample rate and bit depth. All these changes will reduce your audio quality, but if done right, the change in quality might be hardly noticeable, while the reduction in size can be significant.

Exporting in mono

By exporting in mono rather than stereo, you will cut audio file size by half. If the audio is supposed to sound the same in both ears, then there is no reason to make it stereo, so export in mono to reduce audio file size.

Essentially, exporting in mono is outputting one audio track instead of two, which makes the whole audio file size two times smaller.

Export in MP3

MP3 is a lossy audio file format that compresses audio by getting rid of less audible frequencies within the audio. Thus MP3 reduces audio file size almost without any loss in audio quality.

Compared to WAV, MP3 takes up much less disc space and that comes at a small cost of slightly lower audio quality, which you probably won’t notice if you don’t have professional audio gear and a good ear.

High-quality MP3 320Kbps file format is approximately five times smaller than WAV file format.

WAV spectrogram
MP3 320Kbps spectrogram
MP3 128Kbps spectrogram

Lowering bit rate

If you have chosen to export in MP3, you can further reduce the audio file size by exporting it at a lower bit rate. MP3 at 128Kbps bit rate is about 10 times smaller audio file size than WAV and at least two times smaller than MP3 320Kbps.

For most people, the difference between 128Kbps and 320Kbps MP3 is minuscule or completely inaudible. It depends a lot on what kind of gear you’re using and on your hearing. You won’t notice the difference between using cheap earphones or smartphone speakers and even with good gear, it might be hard to notice.

I don’t recommend lowering the bit rate below 128Kbps as that’s where lower audio quality for many people becomes noticeable, although for listening on entry-level gear, you can reduce the bit rate a bit more. Still, 128Kbps is the sweet spot where you still have good quality uncompromised audio, but the file size is small.

MP3 44kHz 32bit 320Kbps (file size 707KB)
MP3 44kHz 32bit 256Kbps (file size 567KB)
MP3 44kHz 32bit 192Kbps (file size 427KB)
MP3 44kHz 32bit 128Kbps (file size 287KB)
MP3 44kHz 32bit 80Kbps (file size 182KB)
MP3 44kHz 32bit 56Kbps (file size 128KB)
MP3 22kHz 32bit 32Kbps (file size 77KB)
MP3 11kHz 32bit 16Kbps (file size 42KB)

Below 56Kbps, the DAW doesn’t support exporting at 44kHz sample rate. Therefore I’ve lowered the sample rate for 32Kbps and 16Kbps bit rate audio samples.

Lowering sample rate

Lowering the sample rate can also reduce file size. It is applicable to both MP3 and WAV file formats.

The standard sample rate is either 44.1kHz or 48kHz. Due to the Nyquist effect, you need a two times higher sample rate to record a certain frequency.

For example, to record a 20khz frequency, which is the top-end of what a human can hear, you would need to record at 40kHz or higher sample rate. That’s why we are usually using 44.1kHz or 48kHz sample rates. These are capable of capturing the frequencies that are audible to the human ear.

Recording at higher sample rates will make little difference for an average user, although there are some situations where higher sample rates can be beneficial and help to preserve high-end frequencies, thus maintaining high audio quality. This is useful when lowering the pitch.

Sample rate directly correlates to audio file size. If the sample rate were reduced by half, the audio file size will also be lowered by half.

However, by reducing sample rate, you will start losing audio quality in high-end frequencies making the overall audio quality worse.

You can reduce the sample rate to 22kHz and it will still sound relatively good as it will capture the main frequencies that the human ear is sensitive to. Anything below 22kHz will start sounding of poor quality.

WAV 48kHz 32bit (3,360KB)
WAV 22kHz 32bit (1,548KB)

Lowering bit depth

Bit depth is similar to video resolution, except it’s for audio. You may as well call it an audio resolution. High bit depth means more amplitude values, which determines higher accuracy when recording a certain value sample.

Lowering bit depth will decrease audio quality. However, it will also reduce audio file size. 16-bit bit depth is still decent and you probably won’t notice much or no difference at all between 16-bit and higher bit depth value.

Exporting at anything below 16-bit will significantly reduce your audio quality and will make a very audible difference. Most likely, at 8-bit and below you will start hearing a harsh hissing sound.

WAV 48kHz 32bit (3,360KB)
WAV 48kHz 24bit (2,522KB)
WAV 48kHz 16bit (1,684KB)
WAV 48kHz 8bit (846KB)

Conclusion

To reach the best audio quality to file size ratio, you will need to export MP3 mono file format at 44kHz sample rate, 16-bit bit depth and 128Kbps bit rate.

To tweak file size even more, I suggest leaving sample rate and bit depth at 44kHz and 16-bit and adjusting bit rate. If you want to save up even more disc space, then you can lower the bit rate down to 80Kbps, but going below that will become very noticeable to anyone.

The size difference between uncompressed, high-quality 48kHz, 32-bit WAV file and 44kHz, 16-bit, 128Kbps MP3 is significant, MP3 file size being almost 12 times smaller. While reducing it to 80Kbps will make the difference even larger.

You can listen to the audio below and check whether you hear much difference in terms of audio quality.

WAV 48kHz 32bit (3,360KB)
MP3 44kHz 16bit 128Kbps (287KB)
MP3 44kHz 16bit 80Kbps (182KB)

For more information about the difference between MP3 and WAV audio files, read this article.

Show Comments