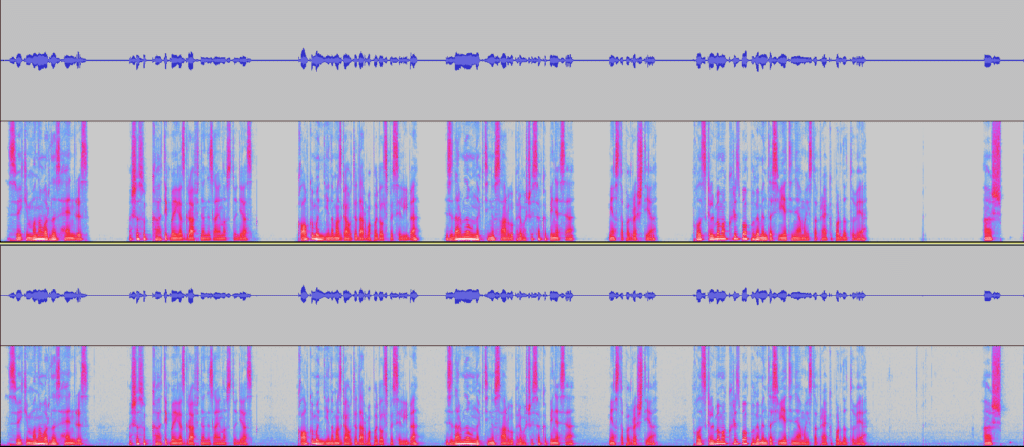
Noise floor is inherent noise in your room. If it is too high you will hear a constant hiss within your recording.
In this article, we will look at two methods that will help to reduce or completely remove noise floor from your recording using Audacity and compare them to see when to use which.
Use spectrogram
First of all, you might not be aware that your audio has a noise floor. By default Audacity only shows a waveform and it may seem as if your recording is clean. To see noise floor better, turn on a spectrogram.


In a multi-view mode you can see both spectrogram and waveform. Now the noise floor should be clearly visible.
Reduce noise floor with noise gate
Noise gate removes noise floor from most of your recording within a few clicks. It is a very powerful tool that saves a ton of time when editing audio and doesn’t affect audio quality.
Install noise gate in Audacity
Noise gate, by default, is not installed into Audacity. You can download noise gate plugin here: https://wiki.audacityteam.org/wiki/Nyquist_Effect_Plug-ins#Noise_Gate
Download plugin to this folder: C:\Program Files (x86)\Audacity\Plug-Ins
If you are not allowed to download directly to C:\Program Files (x86)\Audacity\Plug-Ins folder, then download it anywhere and copy-paste it to the Plug-Ins folder.
To install the Noise gate Plug-in open Audacity and go to Tools -> Add / Remove Plug-ins… -> Find noise gate plug-in -> Click enable

Now you should be able to find noise gate in the Effect menu.
Measure noise floor
Before applying noise gate we will need to measure a room tone. You can do so by simply recording empty room.
Now play the recording and observe playback level. Look at the blue line within the graph, it shows the highest peak of your recording. This is your noise floor (room tone). In this case, it is around -50dB.

How to use noise gate to reduce noise floor
Now that we know noise floor peak level we need to use noise gate settings accordingly. Add about 5dB to your noise floor peak level and this is what your Gate threshold should be.
In this example -50dB+5dB=-45dB
The rest of the settings can be the same as in the picture below. If you feel like it sounds too choppy, then slightly increase Attack/Decay.

Apply noise gate to your whole recording. Here is the same recording with noise gate applied and raw:

However, noise gate only removes noise which is in between vocals. If noise floor is audible during vocals then noise gate doesn’t help.
Although, if your noise floor is so audible you can hear it while speaking, you should probably change the environment you record in or change the microphone.
Nevertheless, we can reduce noise floor even if it is audible during vocals, for this purpose we can use Noise reduction tool.
Noise reduction method
Noise reduction tool is pre-built into Audacity, so you don’t have to download it.
Similarly to noise gate method you will need to record your room tone before applying noise reduction. Once you have it recorded, select it and go to Effect -> Noise reduction… and click Get Noise Profile button.

Once you have taken noise profile, select audio to which you want to apply noise reduction and go to Noise reduction again, and now click OK. The default settings are pretty good.

Comparison

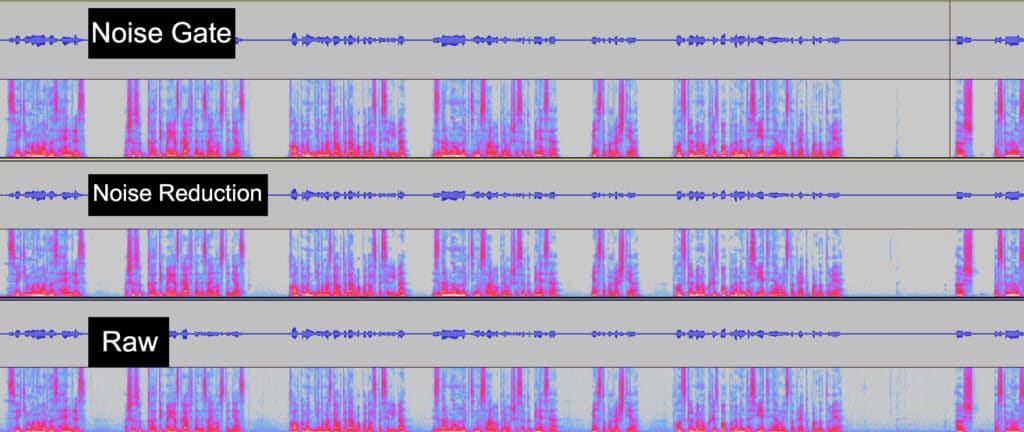
We can compare Noise Gate and Noise Reduction in this picture above.
Noise Gate removes slightly more of the noise floor compared to noise reduction, but we can control that with Level reduction in Noise gate and Noise reduction parameters in Noise reduction. In general, you want to leave some of the noise floor as it sounds more natural with a bit of it.
The main difference between the two methods is how noise reduction tool reduces noise floor even during the vocals, while noise gate only affects the parts in between vocals.
However, noise reduction tool reduces the noise floor during vocals at the cost of audio quality. After applying noise reduction you might notice some artefacts in your audio. That’s because it has removed some of the frequencies that are within your vocals and it now sounds weird.
Therefore, I would only apply noise reduction tool if the noise floor is very high in your recording, otherwise, I would stick with noise gate.
For more in-depth guide on how to use Noise Gate read the following article: https://voiceovertip.com/how-to-use-noise-gate-on-audacity/
Also, if you want to know how to record audio without high noise floor, you can read this article for some tips: https://voiceovertip.com/how-to-record-audio-without-noise/
