Youtube has raised its standards for audio quality a long time ago. People expect you to provide at least decent quality audio and days of low-quality audio are gone.
So in this article, we will overview what we can do to achieve the best possible audio quality for Youtube videos.
Youtube library
Youtube library is an amazing feature provided by Youtube. It provides a large library of music and audio effects and is always growing.
The library has expanded a lot in recent years and has become a great place to find royalty-free music and audio effects.
The best thing about it – you don’t have to ever worry about your Youtube videos getting taken down due to copyright issues.
Although, I had experienced several fake copyright claims when uploading on Facebook.
You can find Youtube library on the left side of the panel when you are in Youtube studio.
Remove mouth clicks
Mouth clicks are almost inevitable and very annoying to listen to. Try to remove them before applying any compression and normalization, as they will be annoying to deal with after the volume is raised.
You can apply mouth click remover to the whole recording. It might falsely apply to some areas, but in general, it does a good job and it is a quick fix method.
I like to use these settings:

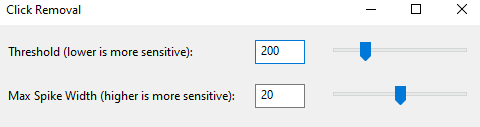
You could also apply click remover only to parts of audio where mouth clicks are audible for the best results, but that will consume much more time if you are dealing with long Youtube video.

Also, click remover is not capable of removing all mouth clicks. Therefore, you will have to carefully remove the rest of them manually, by reducing the volume.
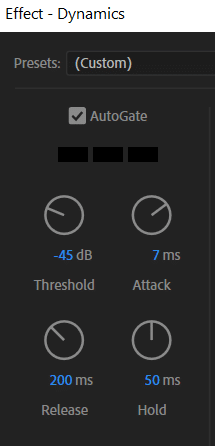
Noise gate will save a lot of time
Noise gate is an amazing tool that will save you a ton of editing time. It removes everything that is below the set threshold. In a few clicks, it will deal with most of the background noise.
For most of us these noise gate settings should work:
- Threshold – -45dB
- Gain reduction (if available) – -30dB
- Attack – 7ms
- Release – 200ms
- Hold – 50ms
Also, this video explains it well:
Here is before and after:


De-esser
De-esser might help with harsh “sssh” sound or in other words sibilance in your audio.
Most DAWs have de-esser built-in by default. You can use it to reduce harsh sibilance. It is especially useful for people with higher pitch voice.
Compression
Compression is a very important tool in the audio editing process. If you had an issue with your audio sounding too quiet then the answer is compression.
Compression evens out your audio to match quieter parts with louder ones which allows you to raise overall audio levels without clipping and distortion, in the end making your audio louder.
It does so by contracting louder parts and then raising the overall volume. Essentially, that makes louder parts stay the same, as it lowers and raises them again, however, the quieter parts are not affected by contraction and then are lifted during the “gain adding” phase.
However, the use of compression is nuanced as we all record at different audio levels, therefore compression settings differ for each recording.
So here is a brief introduction to what each parameter does:
Threshold – Determines the threshold from which contraction applies. If your threshold is set at -10dB any audio above this threshold will be contracted.
Ratio – Determines how harsh is the contraction. The higher the ratio the harsher the contraction. For example, the 3:1 ratio will divide the audio volume by three. Usually, you don’t want to go above 4:1 as that will start to sound unnatural.
Attack time – Determines how long it takes for the compression to kick in, a fade-in effect.
Release time – Determines how long it take for compression to stop, a fade-out effect.
Make-up gain – If make up gain box is available, when checked it will automatically raise the overall audio volume to the maximum available. So your audio peak will be at 0dB. Essentially it is a normalize tool set to 0dB. If make-up gain box is not available in your DAW, you can always apply normalization to set your peak audio level at the desired volume.

Add warmth with EQ
With EQ you can make your audio sound better than it actually, but if you are not careful you can also make it sound worse. So here are some guidelines on how to make your voice sound warmer and more pleasant with EQ.
- First of all remove frequencies below 60Hz, which will remove some of the low-end rumble without affecting how your voice sounds.
- If your audio sound muddy cut up to 4dB around 350Hz to add clarity.
- To add warmth boost by up to 4dB in 100-300Hz range.
- For even more warmth you may try cutting in 2kHz-6kHz range.
Export settings
These are export settings you will want to use when exporting audio for a Youtube video:
Sample rate – 44.1kHz, you can use higher, but it is better to stick with 44.1kHz as Youtube uses 44.1kHz as a standard and conversion from one sample rate to another might cause a loss in quality.
Bit depth – At least 24-bit. For audio editing, I like to use 32-bit float, as that gives you more freedom when editing. However, if you want to save some disc space and you are exporting your final audio, then 24-bit is just as good and takes less disc space.
Format – FLAC. Youtube uses FLAC format so you might as well use it. Although, MP3 suits Youtube as well and will take about 5 times less space. If you are exporting MP3 make sure you are exporting at least at 196kbps bitrate.
You can also use WAV if you don’t care about disc space. Audio files don’t take much disc space anyways, so I usually stick with WAV.
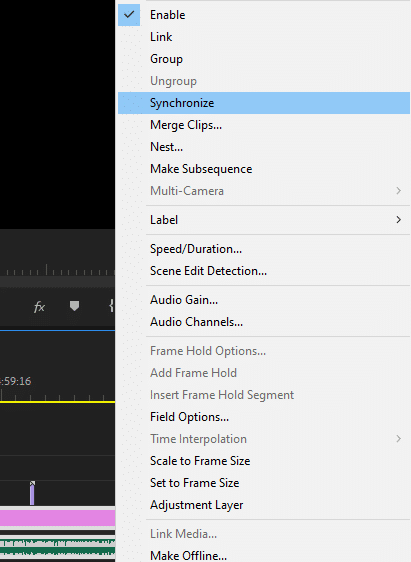
Synchronize audio to video
In Premiere Pro synchronizing audio to video is easy and only takes a few clicks.
All you need to do is have your video file and audio file in the timeline and select them both, then click the right mouse button and click Synchronize.
Adobe Creative cloud
If you are a Youtube creator Adobe Creative Cloud is a savior. It is currently available for $53 (£50 in UK) monthly price and includes three main apps, that for most of us, is enough for video creation. They are Adobe Audition, Premiere Pro and Adobe Photoshop.
In addition, you have access to a ton of other apps that you might find useful.
Order in which you should apply effects
Here is an order in which you should apply effects when editing audio.
- Remove all the noise. Use Mouth click remover, de-esser and noise gate first. When your audio is clean of all the noise you can move on.
- When your audio is clean you can use compression. If you have any noise left it will be raised in this audio editing phase, therefore make sure you’re working with clean audio.
- Finally, you can use an equalizer. If you are planning to apply heavy EQ then make sure you have some headroom. For example, if your audio peaks at -1dB and you are boosting certain frequencies by 4dB you might cause your audio to clip and distort. Also, always use EQ after compression, otherwise, compression will mess up your EQ.