Audio uploaded to the ACX website has some mandatory minimum requirements it’ll have to meet, but that doesn’t guarantee that your submission will be accepted as it’ll be further reviewed. Your audio will rarely meet these requirements without any audio editing. Luckily, Adobe Audition has the tools required to help you meet ACX requirements and we’ll mainly use a compressor, normalize effect and noise gate/noise reduction tools.
You can find complete ACX requirements here.
Here’s a brief rundown of technical requirements when uploading audio to ACX:
- RMS between -23dB to -18dB
- -3dB peak audio level
- Noise floor below -60dB
- MP3 format with a bit rate of 192kbps or higher
- Constant sample rate of 44.1 kHz
- Stick with only mono or only stereo
- Up to 120min audio recording
Unfortunately, Adobe Audition doesn’t support Nyquist plugins. Therefore, there’s no way you can measure whether your audio meets ACX requirements before uploading it to ACX using Adobe Audition alone.
However, you can edit and export your audio from Adobe Audition and use the Nyquist ACX check plugin within Audacity to measure whether your audio meets ACX requirements.
Setting sample rate to 44.1kHz
For most people sample rate is at 44.1kHz by default and you may not need to make any changes. You’ll also have the option to convert your audio sample rate once the recording is finished. However, changing the sample rate after completing your recording may slightly reduce your audio quality; hence it’s best to set the correct sample rate before beginning to record audio.
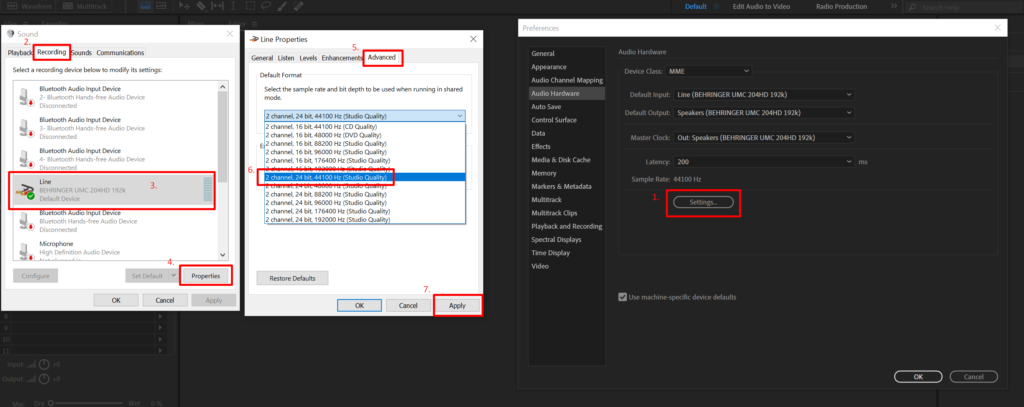
To change the recording sample rate in Adobe Audition follow these steps:
- Go to Edit->Preferences->Audio Hardware
- Click Settings
- Go to the Recording section
- Choose the recording device you’re using
- Click Properties
- Go to the Advanced section
- Choose 24-bit, 44100 Hz (Studio Quality) settings
- Click Apply and OK.
You may also want to do the same with the Playback settings, although it’s not mandatory.

Setting noise floor below -60dB
Ideally, you’ll want to address the noise floor before working on the RMS and peak audio level. That’s because you need to eliminate any noise within your audio recording before increasing the audio level. Otherwise, you would be simultaneously increasing the noise floor. Initially, your noise floor level might be alright, but it often becomes too high when you increase audio levels.
There are two ways you can deal with noise floor in Adobe Audition; you can use a Noise gate or a Noise reduction tool. The ideal way would be using a noise gate since it doesn’t reduce audio quality. However, you would need to install a noise gate plugin because Adobe Audition’s built-in noise gate doesn’t have the option to control the noise gate range, making your noise floor too low for the ACX’s liking.
The easier method is applying a noise reduction tool, which occasionally adds some audio artifacts but will clean up your audio from lots of unwanted noise in a few clicks.
You don’t need to apply both noise gate and noise reduction. Choose only one.
Noise gate method
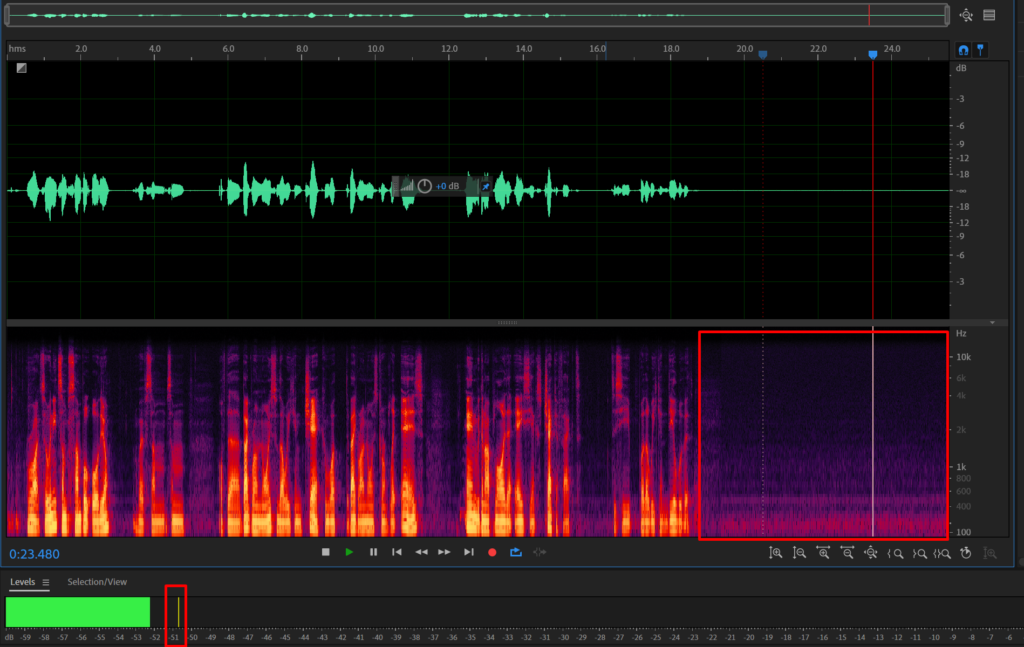
To deal with the noise floor, I recommend playing the quiet part of your audio recording and checking where it peaks on the audio level meter and this will give you the basis to apply a noise gate effect.

Now that you know your noise floor select your audio recording and apply the noise gate. I am using a free Bob Perry Gate which you can download here or choose the noise gate of your liking.
Set your noise gate settings:
- Threshold: 5dB to 10dB above your noise floor
- Attack: 2ms
- Release: 200ms
- Hold: 50ms
- Range: -10dB to -20dB
- Click Apply

Noise reduction method
- Select your audio recording
- Go to Effects->Noise reduction / Restoration -> Adaptive noise reduction
- Set Reduce Noise By parameter to around 15dB. It will differ for everyone as you’ll have different noise floor levels, but it should be in around the 10dB to 20dB range.
- Leave the rest of the settings as it is and click Apply.

If your noise floor is still too high after applying the effect, set Reduce Noise By parameter higher; if it’s too low, make it lower.
Setting RMS between -23dB to -18dB and -3dB peak audio level
These two requirements are closely related as the RMS (Root mean square) calculates the overall loudness of your audio recording and peak audio level refers to the loudest part of your audio.
Normalize
You can first try to deal with both of these requirements by setting your peak audio level at -3dB. It will often simultaneously fulfill both of the requirements.
To achieve a -3dB peak audio level follow these steps:
- Select your audio recording
- Go to Effects -> Amplitude and Compression -> Normalize
- Normalize to -3dB
Compressor

You’ll have to use a compressor if your audio doesn’t meet RMS requirements after applying the Normalize effect.
You can apply compressor by following these steps:
- Select your audio
- Go to Effects -> Amplitude and Compression -> Single-band Compressor
- Set the Threshold to around -8dB. Usually, it’s somewhere in the -6dB to -10dB range, but it depends on how dynamic your audio recording is. Quieter and more dynamic audio will require a lower threshold.
- Set Ratio to 3:1
- Leave the rest parameters as default and click Apply.
Compressor will make your louder parts quieter, allowing you to increase your audio levels without introducing audio clipping.
Now, again normalize your audio to -3dB. This should help you meet both of the requirements. If your RMS is still too low, try using a lower threshold when applying a compressor. Alternatively, if your RMS is now too high try using a higher threshold.
Exporting MP3 with a bit rate of 192Kbps or higher
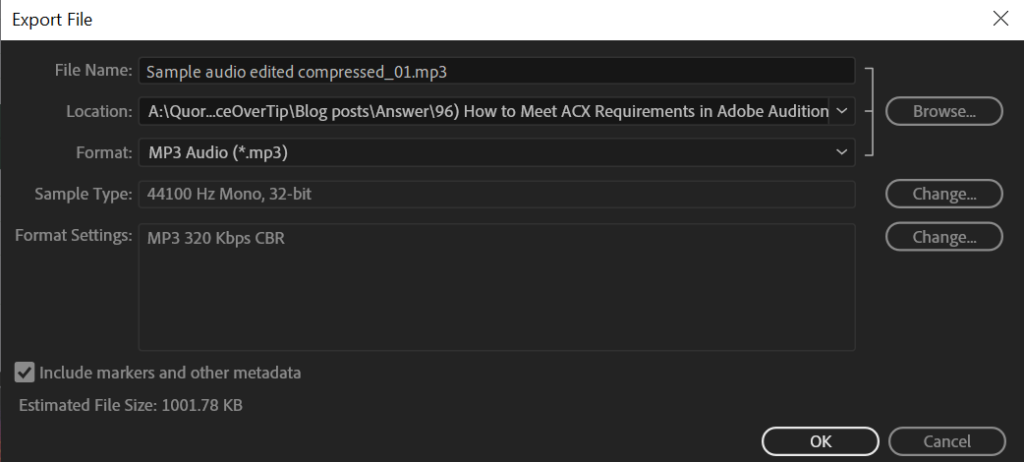
Finally, you’re almost done. The last thing you must do is make sure you use the correct exporting settings.
- Go to File->Export->File
- Choose MP3 Audio format
- Set your Sample Type to 44100 Hz
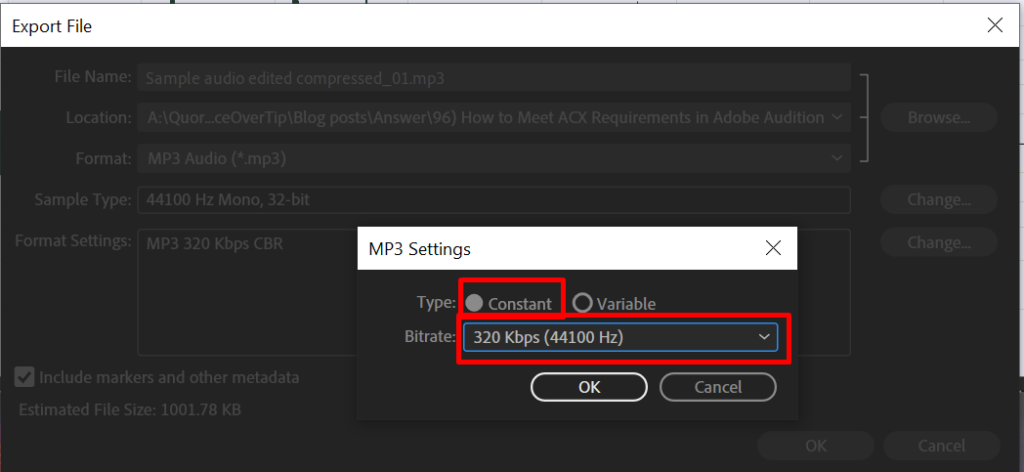
- Set your bit rate to 192Kbps or higher and make sure it’s constant (CBR)
- Click OK


If everything is done correctly you’ll get this result analyzing your audio with the ACX check:


I am using the Audible audio lab program to check if everything meets Audible standards.
I fun a file until I get a “no issues found” response.
Do I have to do more than that?