Adobe Audition is a capable DAW with plenty of tools to remove background noise from your audio recording. With Audition, it’s best to use non-damaging tools such as EQ, Noise Gate and manual removal and only resort to Adaptive Noise Reduction if the aforementioned tools fail to completely remove the background noise.
The tools here are mentioned in a sequence in which I would usually use them.
Remove low-end rumble noise with Equalizer
Adobe Audition has plenty of equalizers to choose from. Choose whichever you like, most of the time I tend to use Graphic Equalizer (30 Bands).
Equalizer is a great tool to remove some of the low-end background noise such as rumble from your audio recording. It’s the first tool I like to apply since it won’t damage your audio but it’ll slightly reduce the background noise of your recording.
Here’s how to remove low-end background noise with equalizer in Adobe Audition:
- Select your whole audio recording (CTRL+A)
- Go to Effects->Filter and EQ-> Graphic Equalizer (30 Bands)
- Males should remove frequencies up to 80Hz and females should remove frequencies up to 100Hz
Usually, the human voice doesn’t consist of frequencies below 80Hz unless you have a very deep voice in which case you should only remove frequencies up to 60Hz to be on a safer side.
Don’t expect EQ to fix all the background noise problems you have but it’ll nudge you towards better audio quality.

Remove background noise using a Noise Gate
Noise gate is a very effective tool to quickly remove background noise without diminishing audio quality. I recommend it, especially for longer recordings such as podcasts, youtube videos or audiobook narrations, it’ll significantly reduce the audio editing time.
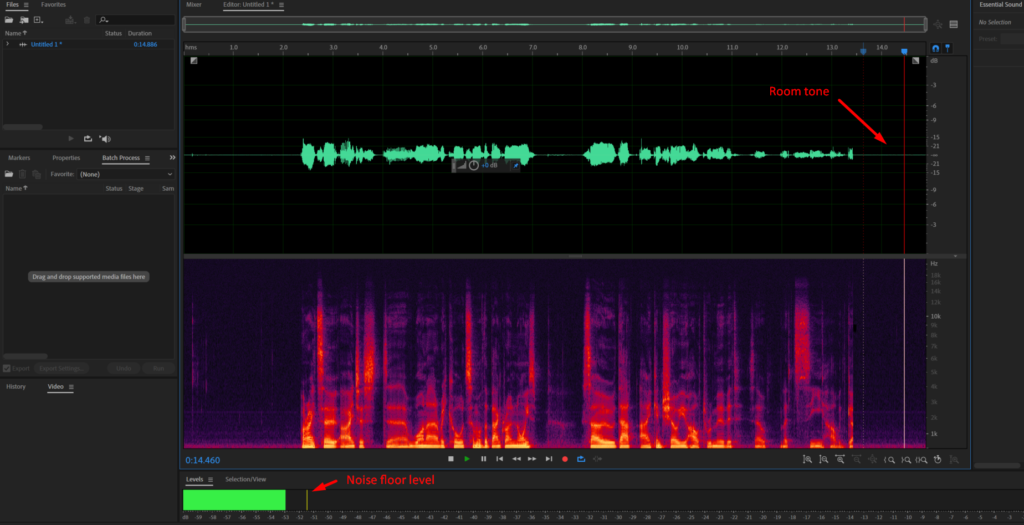
Noise gate works by removing the noise below the set threshold. Therefore, before you apply the Noise gate it’s smart to measure what’s the level of the noise floor in your audio recording. You can do that by playing the quiet part of your recording with only room tone audible and observing playback level meter in Audition.

Here’s how to use noise gate in Adobe Audition:
- Measure your noise floor by playing the quiet part of the recording and observing the playback level meter
- Select your whole audio recording
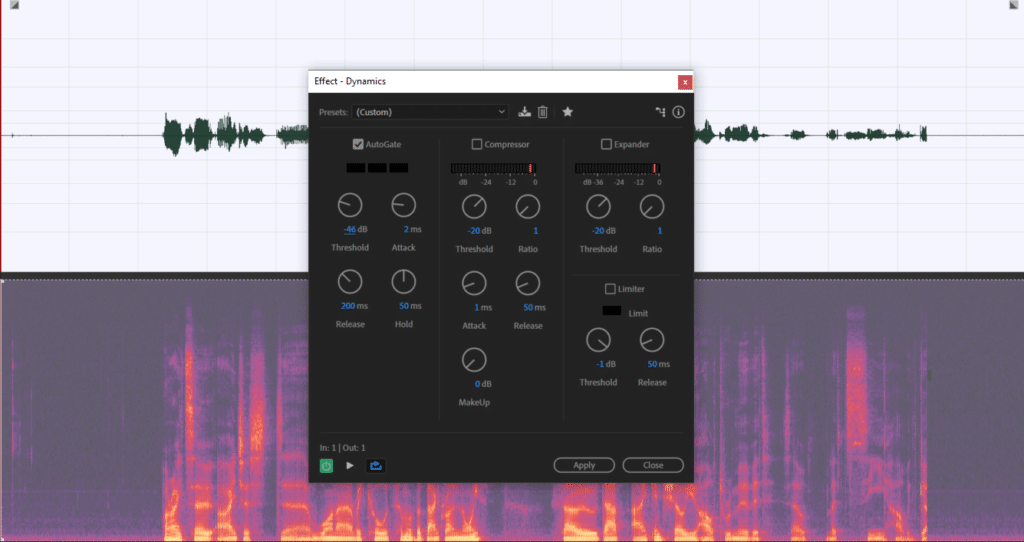
- Go to Effects->Amplitude and Compression->Dynamics
- Check AutoGate box and uncheck the rest
- Set your threshold about 5dB above the noise floor that you’ve measured before
- Set Attack to 2ms, Release 200ms, Hold to 50ms
- Click Apply

Use manual selection and removal for odd noises
Usually, after applying EQ and noise gate you’ll have some odd clicks left in your audio recording. They should be removed manually using a default Marquee Selection Tool (E):
- Click E to select the Marquee Selection Tool
- Look at the spectrogram for odd leftover noise in your audio recording
- Select it and press delete

Make sure you select audio in the spectrogram and not a waveform. In spectrogram, you’re only muting the audio and it won’t affect your timeline. In waveform by deleting you’ll be shortening your recording and affecting the timeline.
Use click remover to remove mouth clicks and keyboard noise
Click remover detects various clicks such as mouth clicks or keyboard noise and removes it for you. A lot of such noise will be removed by your noise gate and manually but noise gate doesn’t affect audio where your voice is audible and cleans audio in between vocals only. Therefore, a lot of clicks may still be present in your recording overlapping with the vocals. Click remover can remove these overlapping clicks without diminishing your audio quality too much.
To apply click remover in Adobe Audition:
- Select your audio recording
- Go to Effects->Noise Reduction / Restoration->Automatic Click Remover
- Click Apply
Apply noise reduction when dealing with harsh background noise
I only use Adaptive Noise Reduction effect if all other methods fail to suffice and I’m dealing with a very noisy background, otherwise, skip this step.
While Adaptive Noise Reduction is a very capable tool and removes most of the noise in a few clicks, it also introduces some audio artefacts which lower your overall audio quality. When using this effect, you need to measure whether the background noise is so harsh as to make it worth applying the effect.
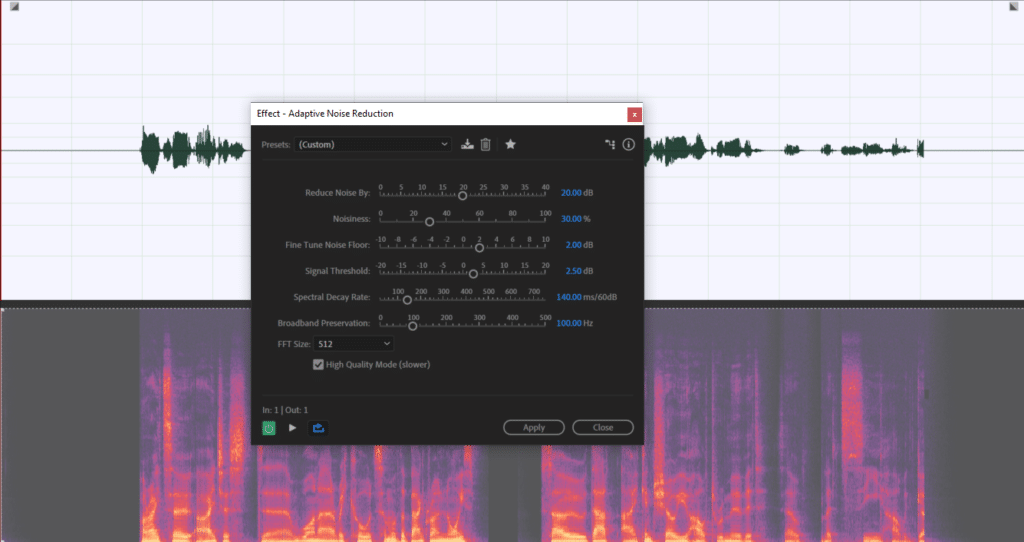
If you decide to use the effect aim to use default settings first and then gradually increase Noisiness and Reduce Noise By parameters if required. The default settings won’t diminish audio quality too much, I find them very acceptable but increasing parameters introduce significantly more audio artefacts.
To apply Adaptive Noise Reduction in Adobe Audition:
- Select your audio recording
- Go to Effects->Noise Reduction / Restoration->Adaptive Noise Reduction
- Click Apply

