How to Change Recording and Playback Device in Audacity?

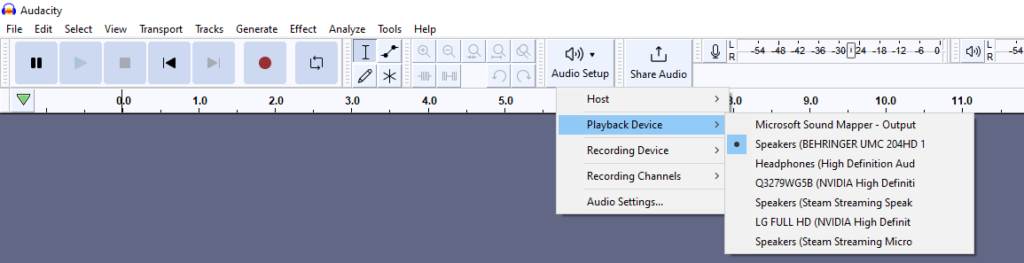
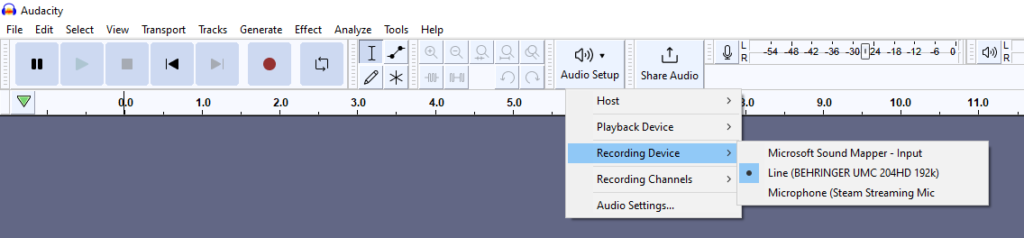
You can change both the recording device (microphone) and playback device (headphones or speakers) in Audacity through the Audio Setup menu. Your recording/playback devices won’t necessarily be the same as the current devices selected on your PC/Mac. Also, within the device list your playback/recording device might have a different name than you anticipate. If you can’t find your device try out the whole list of devices. For example, in my case ‘Headphones (High Definition Audio)’ playback device stands for Edifier speakers as the device name is not read correctly by my PC.

To change the Recording Device in Audacity follow these steps:

  1. Click on Audio Setup -> Recording Device
  2. Choose your microphone or audio interface

To change the Playback Device in Audacity follow these steps:

  1. Click on Audio Setup -> Playback Device
  2. Choose your headphones/speakers or audio interface with headphones in them
Choosing your playback device within Audacity.
Choosing your recording device within Audacity.

Show Comments

How to Synchronize Video to Audio in Premiere Pro?

When recording audio and video separately you’ll have to sync them one to another to match video footage to the sound. Usually, that’s required when recording video with a dedicated camera, while audio is recorded on a microphone that isn’t plugged into the camera.

Luckily, Premiere Pro has a built-in tool that allows you to synchronize your audio to video with a click. Here’s a step-by-step guide:

  1. Drag your audio and video footage onto the timeline
  2. Move camera video and audio onto separate tracks from the microphone and on-screen video track (if it was recorded)
  3. Place camera footage adjacent to microphone audio and on-screen video (if it was recorded)
  4. Select both camera and microphone audio and click the right mouse button
  5. Choose Synchronize
  6. Select Audio as Synchronize Point and click OK
  7. Select camera video footage, click the right mouse button and choose Unlink
  8. Delete redundant camera audio track.
Moving your camera and microphone/on-screen footage onto the timeline in Premiere Pro.
Placing your footage adjacent one to another and applying Synchronize tool in Premiere Pro.
Choosing audio as a Synchronize Point and syncing your audio to video.
Deleting redundant camera audio track in Premiere Pro.

When inserting your footage in the Premiere Pro timeline your audio will be linked with video. Once camera video footage and microphone audio are synchronized, you’ll need to unlink camera audio and video to delete audio track while maintaining video track.

Show Comments