Mono audio creates an identical sound in both of your headphone cups while stereo allows playing two distinct audio tracks on each ear. Audacity is capable of turning your mono track into stereo and vice versa.
If you wish to have the same sound in both of your ears there’s no reason for going stereo, there’s no distinction in quality between mono and stereo. Stereo is only advisable when you need two distinct tracks playing at the same time in different ears. Also, if you’re using a single speaker then your stereo track will play as mono.
Before attempting to turn your mono tracks into stereo it’s best to make sure they’re both of the same lengths, otherwise, you’ll end up with a stereo track with one side of the earcup providing no audio at some point.
Here’s a quick guide on how to convert mono to stereo audio in Audacity:
- Select both of your mono tracks by holding CTRL and clicking on both of your tracks or pressing CTRL+A combination.
- Click the downwards arrow next to the name of one of your tracks or press SHIFT+M combination.
- Choose Make Stereo Track in the options menu.

Listen to the two tracks below to hear the difference between the same audio file in mono and stereo. A mono track has the same audio playing in both ears while stereo plays music in one ear and wind noise in another.
Mono track:
Stereo track:
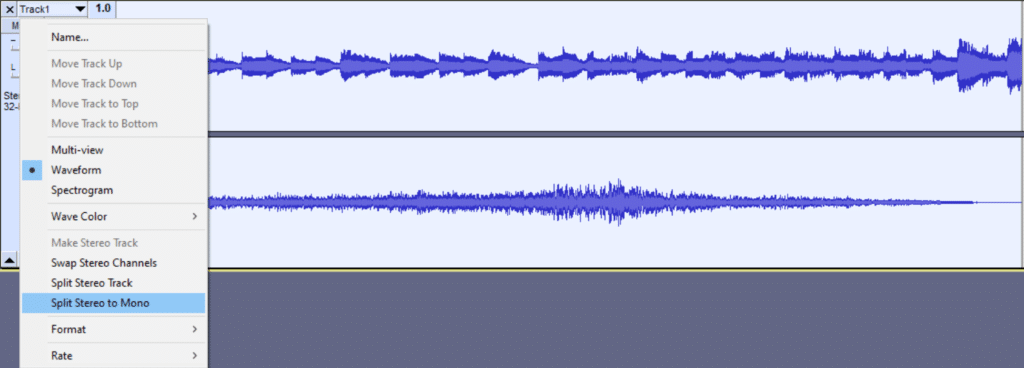
How to Convert Stereo to Mono in Audacity?
To convert stereo back to mono you’ll need to select your stereo track and open the same downwards arrow menu again (SHIFT+M) and choose Split Stereo to Mono. Also, you have an option to click on Split Stereo Track it will create two mono tacks one of which will be panned all the way to the left and the other all the way to the right essentially making it a stereo track still. You can adjust the pan for both of these tracks to create a desired combination of tracks in both of your ears.