You can easily improve audio quality in Premiere Pro by using built-in effects within the software. Premiere Pro has powerful tools to make your audio sound cleaner, louder and without unwanted reverb. In addition, Premiere Pro has Adobe Audition integrated which offers even more tools to improve your audio quality.
First of all, you’ll want to remove noise from your audio. Premiere Pro has various tools (EQ, Click remover, DeNoise) for removing noise all of which will help to significantly improve your audio quality. Once the noise is removed you’ll be dealing with volume (Compressor and Amplify) and clarity (EQ) to further enhance your audio.
Each effect we’ll be using can be found at Effects->Audio Effects and you’ll be applying effects by dragging them onto your audio track and then you’ll control settings in Effect Control menu.
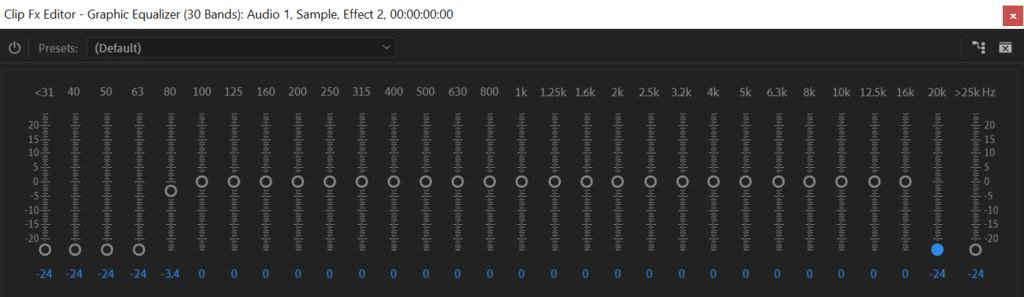
Remove unwanted frequencies (EQ)
This only applies to your vocals. You want to remove unwanted frequencies that are often causing low rumble noise. For that, I like to use Graphic Equalizer (Audio effects->Filter and EQ->Graphic equalizer). Within the equalizer remove any frequencies below 60Hz and above 16kHz. Human voice doesn’t consist of frequencies below 60Hz or above 16kHz and if there’s anything in that range in your audio it’s most likely noise.
You can read more about how to improve audio quality with EQ here.
Click remover
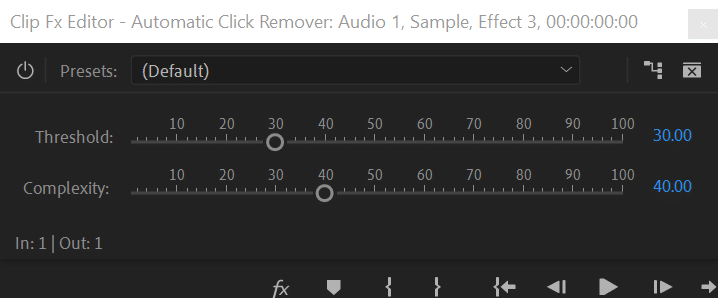
Click remover (Audio effects->Noise Reduction/Restoration->Automatic Click Remover) will help you to remove mouth clicks created by the tongue touching the roof of the mouth or teeth. Mouth clicks usually are spread throughout your whole recording and are hard to remove since so often they appear in the middle of a sentence. Click remover helps to deal with them in a few clicks without having to find and remove each separately.
Within click remover, you have two settings: Threshold and Complexity.
Threshold is responsible for the sensitivity of click remover. A lower threshold will create higher sensitivity for detecting mouth clicks at the cost of possibly false detecting mouth clicks.
Complexity will determine the harshness of effect, higher complexity will thoroughly remove mouth clicks, however, that might create some audio artifacts. Lower complexity will subtly mitigate clicking noise without creating unwanted side effects.
I like to set my click remover at Threshold – 30 and Complexity – 40, but you might want to play around with it to see what fits you best. Once you got the settings right you can apply the effect to your whole audio recording. You can read more about using click remover here.
Remove noise with DeNoise
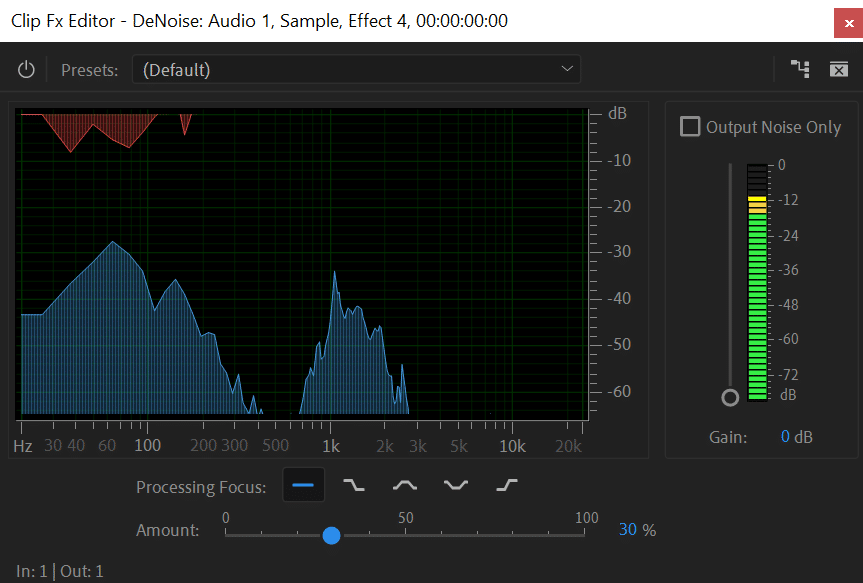
DeNoise (Audio effects->Noise Reduction/Restoration->DeNoise) is the final tool you want to use when reducing noise within your audio recording. DeNoise tool will remove any leftover hissing sound and odd clicks and sounds. However, I would use this tool sparingly as it might introduce audio artifacts into your recording. Therefore, use the lowest viable ‘Amount’ to fix any glazing problems within your audio recording.
You can check ‘Output Noise Only’ button to see what exactly you are removing which will give you a sense of what you’re doing. Each audio recording will require different settings but most of the time I like to set ‘Amount’ at around 30% which is slightly lower than default settings.
DeNoise is a superb tool if your audio has a lot of noise but if you have a clean recording I would skip this effect as to not introduce any new problems.
You can read more about reducing background noise here.
Remove reverb
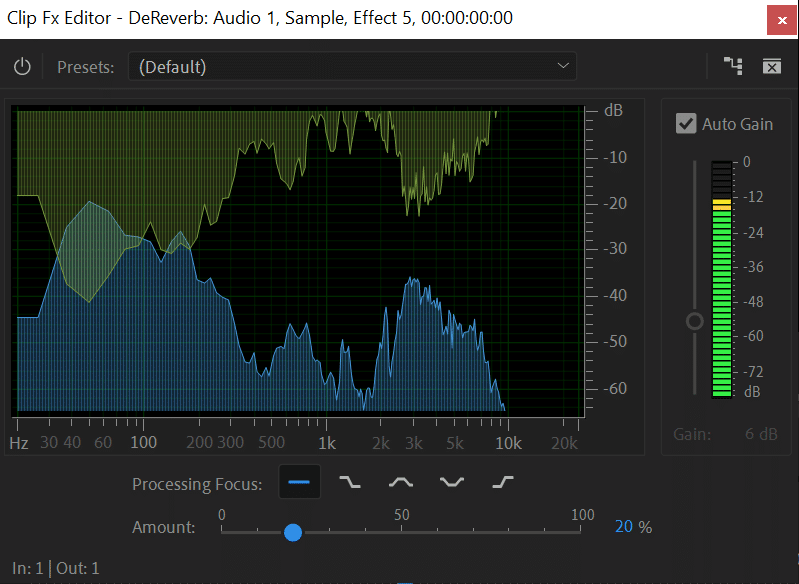
For a lot of homemade audio recordings, reverb is a huge issue. Some reverb is alright and sounds natural, however, oftentimes it needs to be controlled. For that, Premiere Pro has a powerful tool – DeReverb (Audio effects->Noise Reduction/Restoration->DeReverb).
Similarly to DeNoise it’s quite straightforward. You have only one setting to worry about which is ‘Amount’. Each recording has a different level of reverb, therefore, there’s no one right setting. Still, I would suggest not going anywhere above 50% as your audio will start to sound muffled and you may do more harm than good.
I’ve recorded quite a bit in a room with bad reverb and I usually end up setting ‘amount’ somewhere in 20-40% range.
You can read more about choosing the right room for recording with less reverb here.
Make your audio louder with compression
Compression (Audio effects->Amplitude and Compression->Single-Band Compressor) makes the quieter parts in your audio louder and louder parts quieter which makes the whole recording more compressed and even. You might want to use compression if your audio is too quiet and you can’t get it louder without avoiding clipping. Once the audio is compressed you can then add some gain to make the whole audio recording louder.
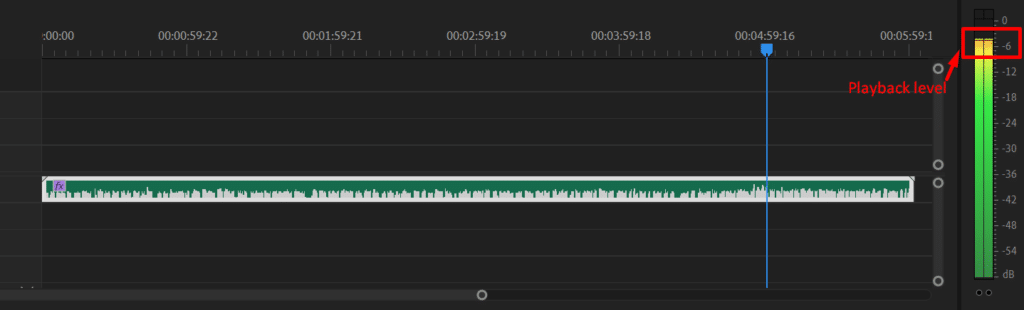
First of all, find where your audio peaks are. You can do that by observing your track waveform, look for the highest peak. Once you find it, play through it and check your playback levels.

Now that you know your loudest peak open Single-Band Compressor and set your threshold ~6dBs lower. For example, if my highest peak is -5dB then I will set my threshold at -11dB. Setting your threshold even lower will make you apply more of the compression (and will make it even louder) and setting it high (closer to 0) will make it more subtle.
Single-Band Compressor settings:
- Threshold 6dB lower than peak level
- Ratio 3:1
- Attack: 10ms
- Release: 100ms
- Output gain: 0dB

Once you applied Single-Band Compressor, click the right mouse button on the audio track and choose Render and Replace…
Again find the loudest peak in your audio. Once you got it, apply Amplify and add gain to reach a peak audio level of ~-2dB. So if my new peak is at -9dB, I would add 7dB using an Amplify effect. You can read more about compression and increasing audio volume here.

Demudding
Demudding helps to add clarity to your audio. If you feel like the audio sounds mudded and unclear try using the EQ to reduce responsible frequencies and improve your audio quality.
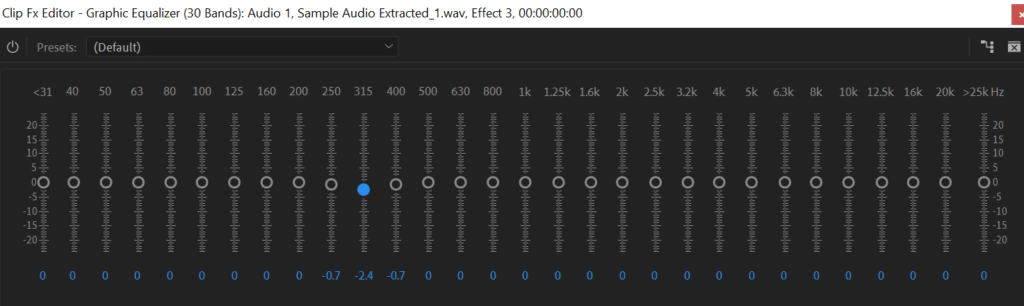
Open Graphic Equalizer (Audio effects->Filter and EQ->Graphic Equalizer) and cut up to 4dB around 300Hz frequencies. It might be slightly higher or lower, so you might want to play around, but generally, it’s around 300Hz. You can find more information about using EQ to improve your audio quality here.
Pingback: How to Split and Merge Audio in Premiere Pro? - Voice Over Tip
Pingback: How to Remove Mudiness from Audio? - Voice Over Tip